MicroPython #1: Introduction and Gearing Up
MicroPython
An Inroduction and Firmware Flashing to the Tool
MicroPython is re-implemented form of Python 3 programming language that is optimised to run on microcontrollers and in constrained environments. It is much similar to generic Python programming language. Simply said, MicroPython is Python for Microcontrollers.
It only includes a small subset of the Python standard library. It also includes modules to access low-level hardware this means that there are libraries to easily access and interact with the General Purpose Input/Output (GPIO's) of Microcontrollers.


Usually on Microcontrollers, we run Embedded C, C++ or other forms of this language. Here with MicroPython, we can integrate Python environments with MC's and program them. Using Python with MC's extends the power of these small embedded chips and takes it to next level opening vast powerful platform for Embedded Technology Industries, Developers, Hobbyists and also Students.
Getting Started
To begin with, MicroPython is a full Python compiler and runtime that runs on the bare-metal. You get an interactive prompt (the REPL) to execute commands immediately, along with the ability to run and import scripts from the built-in filesystem. The REPL has history, tab completion, auto-indent and paste mode for a great user experience.
As we have some Integrated Development Environments(IDE's) for Python, we have it here too. Noting few, Thonny, uPyCraft are some of the main IDE's used for MicroPython programming. To start,
Install the Thonny IDE and lets go on with getting firmware set up for development board.
Now, being Python 3.X and MicroPython platform installed, we must set the hardware and make it compatible to program. We do the same by flashing a firmware to the development board which we'll see soon.
Say, for ESP 8266 Board, you must go to Downloads >> ESP 8266 >> Latest Firmware and download the same which is given as .bin file.
Here on, we will catch up one particular board and go on with it.
I am choosing ESP 8266 Development board by Espressif Systems, which is most commonly used in IoT and Wi-Fi based stuffs. It is very powerful platform for makers and developers. Alternatively, ESP 32 can also be chosen for which all follow up steps remains similar.
Download Firmware for ESP 8266 here.
Note : Basically, MicroPython is an Interpreted programming language and it doesn't use any system compilers or any external technique to convert MicroPython programes to binary/Hex sequences in order to feed it to MC's as it is being done in C++ or Embedded C. So, we need firmware readily flashed onto MC so as to get MicroPython into. All functions are done inside a single chip.
Intresting right ? Move on, lets explore !!
>> Install Python 3.X installed on your system.
Get it from python.org
>> Download respective IDE for MicorPython.
Here, let us go with Thonny IDE. Get it from thonny.org. I am using Windows system throughout. If you're on Mac or Linux, please cope up !Install the Thonny IDE and lets go on with getting firmware set up for development board.
Now, being Python 3.X and MicroPython platform installed, we must set the hardware and make it compatible to program. We do the same by flashing a firmware to the development board which we'll see soon.
>> Fashing Firmware to the appropriate tool.
Any MicroPython compatible hardware can be used for this. Here are list of few boards supporting MicroPython.- MicroPython pyboard
- Pyboard D-series
- ESP8266 boards
- ESP32 boards
- WiPy and CC3200 boards
Say, for ESP 8266 Board, you must go to Downloads >> ESP 8266 >> Latest Firmware and download the same which is given as .bin file.
Here on, we will catch up one particular board and go on with it.
I am choosing ESP 8266 Development board by Espressif Systems, which is most commonly used in IoT and Wi-Fi based stuffs. It is very powerful platform for makers and developers. Alternatively, ESP 32 can also be chosen for which all follow up steps remains similar.
 |
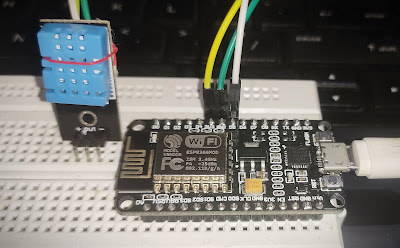
| ESP 8266 Module - NodeMCU _V3 |
Download Firmware for ESP 8266 here.
Note : Basically, MicroPython is an Interpreted programming language and it doesn't use any system compilers or any external technique to convert MicroPython programes to binary/Hex sequences in order to feed it to MC's as it is being done in C++ or Embedded C. So, we need firmware readily flashed onto MC so as to get MicroPython into. All functions are done inside a single chip.
Intresting right ? Move on, lets explore !!
>> Finding your MicroPython .bin file
By default, the downloaded file will be saved in downloads folder on your C: driveFind out exactly where it is. So, with your Terminal window, you’ll need to navigate to the Downloads folder using the cd command:
cd Downloads
dir

As seen above, it is located at Downloads folder: esp8266-20191220-v1.12.bin
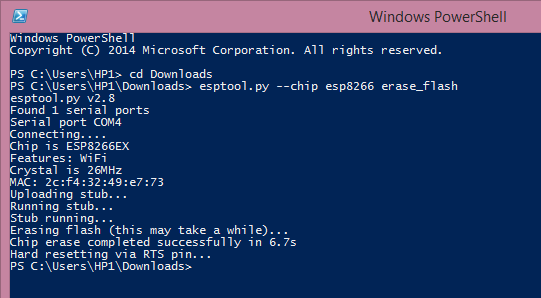
>> Erasing ESP8266 Flash Memory
Before flashing the MicroPython firmware, you'll need to erase the ESP8266 flash memory. So, with your ESP8266 connected to your computer and hold down the “BOOT/FLASH” button in your ESP8266 board.
Type the below commands on your Command Prompt or Powershell window in Downloads directory.
Type the below commands on your Command Prompt or Powershell window in Downloads directory.
esptool.py --chip esp8266 erase_flash
When the “Erasing” process begins, you can release the “BOOT/FLASH” button. After a few seconds, the ESP8266 flash memory will be erased.

>>Flashing MicroPython Firmware on ESP8266 with esptool.py
With your ESP8266 flash memory erased, you can finally flash the MicroPython firmware. You need to replace with your serial port name (Ex :COM4) and the ESP8266 .bin file location (Ex : esp8266-20191220-v1.12.bin) in the below command and execute the same in your Command Prompt or Powershell Downloads directory.
esptool.py --chip esp8266 --port <serial port> write_flash --flash_mode dio --flash_size detect 0x0 <bin file name>
Hold down the “BOOT/FLASH“, before running the flash command. After a few seconds this is what you should see :
Ended up with this ? Congradulations ! You're all set up to play on your ESP Tool with MicroPython fully loaded.
If not, hold on ! I am still waiting here. Just drop down your comments, troubles or any bugs you found on the way in reaching so far in the comment section below.
Note : There is also an online IDE for MicroPython provided by them. You can access it at micropython.org/unicorn/
Hope you followed up things tight.
Spark something
Cheers !!!


Excellent work
ReplyDeleteThanks. Glad you liked it :)
Delete