MicroPython #3: PWM, LED Fade
MicroPython
Pulse Width Modulation & Duty Cycles
At the end of this, you will be able to implement PWM technique and see it on inbuilt LED in Pin2 of ESP 8266 and also by attaching external LED's. The whole process will be done by MicroPython programming. So, Let's begin with !
Note: You must have your MicroPython firmware pre-flashed onto your board before beginning with this. If not, follow up these before getting back here.
Introduction to PWM & its concepts
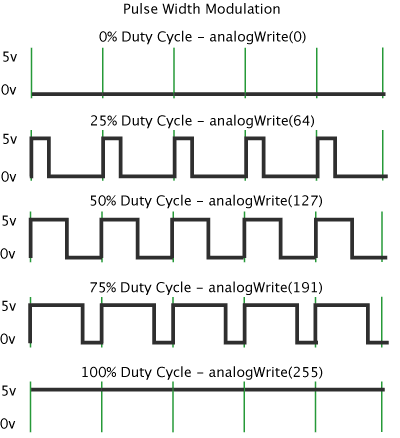
Pulse Width Modulation(PWM) is a technique for getting analog results with digital means. Digital control is used to create a square wave, a signal switched between on and off. This on-off pattern can simulate voltages in between full-on (5 Volts) and off (0 Volts) by changing the portion of the time the signal spends on versus the time that the signal spends off. The duration of "on time" is called the pulse width. To get varying analog values, you change or modulate, that pulse width. If you repeat this on-off pattern fast enough with an LED, for example, the result is as if the signal is a steady voltage between 0 and 5v controlling the brightness of the LED.

Simply told, PWM is just varying the time on and time off of LED/ time high and time low of signal (0-3,3V here)
Implementation on ESP8266 (NodeMCU)
Using MicroPython PWM can be easily implemented and you will be able to get signals with different duty cycle based on frequency and delay set. Let's go through then !
The algorithm goes as follows :
> Import the Pin on the device to your program using 'from machine import Pin'.
MicroPython says, " Hey Pin 2 there on ESP 8266, someone is calling you. Come on! "
Also, call PWM class here with 'import pin, PWM'.
> Call the time
" Hey clock, help me in knowing the time/delay ".
With the help of time, you can turn LED on and off. Call time with 'from machine import sleep'. time.sleep(<delay>) is used to set delay.
> Set frequency for PWM cycles with 'frequency = x' and then set Pin number and call frequency as declared above.
> Now, it's all about repeating the cycle. We have already set factors and made declarations.
for i in range (<initial>, <final>, <step size>):
Here, we'll need only <final limit> and <Initial value> in these 3 factors and others will be taken '1' by default. Giving a range of analog values, 0-1023+1 (10 bit) within a for loop, ranging will be possible with default intervals of 1.
Putting these functions in while loop, it will be possible to visualise Fade in LED attached to Pin 2.
Below is the MicroPython script for the same:
---------------------------
---------------------------
from machine import Pin, PWM
from time import sleep

frequency = 5000
led = PWM(Pin(2), frequency)

while True:
  for duty_cycle in range(0, 1024):
    led.duty(duty_cycle)
    sleep(0.005)
----------------------------
Get this written and run the script. There there !
Get this written and run the script. There there !
You will find Pin 2 LED fading with declared Interval. Try changing interval, frequency, delay and you'll find something interesting !
LED's can also be attached to any of the other GPIO's and the same function can be achieved in 10-bit resolution. Change the Pin number (line4) of the source code
The pin assignment is in the format GPIO(x) and not Pin(x) of ESP8266.
(Ex: Pin 17 (D4) is GPIO 2 which we declare as Pin(2) in code)
Reference Schematic:
Summary: All of the above proves the power of MicroPython and shows its simplicity compared to C++ / Embedded C. Now, we have a fading LED. Why not we use this to control BLDC, Steppers, Pump etc, Integrate to make flashing and fading LED's,............and what not ??
Just drop down your comments, troubles or any bugs you found on the way in reaching so far in the comment section below.
GitHub link for source codes: https://github.com/NavadeepGaneshU/CL3VERTRONICS
Hope you followed up things tight.
Spark something
Cheers !!!
Cheers !!!


To learn embedded systems professionally (to build a career out of it ), which microcontroller should i buy/learn ? i have intermediate experience in arduino. Or what should be my next microcontroller after arduino?
ReplyDeleteHi, good to see your interest in embedded systems.
DeleteOne can start up with arduino(you're rightly doing it) and move to more verbose type of MCUs like STM32, MSP430 by Texas Instruments(great option and their TI e2e community is active) etc.
Parallelly, you can learn about processor architectures and try Raspberry Pi and Linux. FPGAs are nice choice if you're looking into digital and configurable section/ASIC design part of embedded systems.
Check out this video by one of my friend https://youtu.be/TM8QAC-mGD8 on how to build embedded career. Feel free to connect with me over LinkedIn or Email by the links one blogs home page. hope tis helps :)