Posts

Showing posts from April, 2020

MicroPython #4: Interfacing Sensors

Image
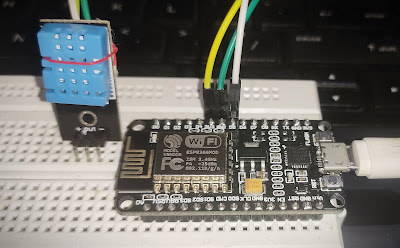
MicroPython Interfacing Sensors DHT-11 Sensor interphase with NodeMCU At the end of this, you will be able to interphase DHT11 Temperature Sensor with ESP 8266 NodeMCU bare-metal and also by attaching external LED's. The whole process will be done by MicroPython programming. So, Let's begin with !  Note:  You must have your MicroPython firmware pre-flashed onto your board before beginning with this. If not, follow up these  before getting back here. MicroPython #1: Introduction and Gearing U p MicroPython #3: PWM, LED Fade MicroPython #2: Triggering I/O's Introduction to DHT 11 and Sensor Interphase  The DHT11 is a basic, ultra low-cost digital temperature and humidity sensor. It uses a capacitive humidity sensor and a thermistor to measure the surrounding air, and spits out a digital signal on the data pin. Here, we'll operate it on Analog mode. There is a dht   module that comes with the MicroPython firmware by default. So, it is e

MicroPython #3: PWM, LED Fade

Image
MicroPython Pulse Width Modulation & Duty Cycles At the end of this, you will be able to implement PWM technique and see it on inbuilt LED in Pin2 of ESP 8266 and also by attaching external LED's. The whole process will be done by MicroPython programming. So, Let's begin with !  Note:  You must have your MicroPython firmware pre-flashed onto your board before beginning with this. If not, follow up these  before getting back here. MicroPython #1: Introduction and Gearing U p MicroPython #2: Triggering I/O's Introduction to PWM & its concepts Pulse Width Modulation(PWM) is a technique for getting analog results with digital means. Digital control is used to create a square wave, a signal switched between on and off. This on-off pattern can simulate voltages in between full-on (5 Volts) and off (0 Volts) by changing the portion of the time the signal spends on versus the time that the signal spends off.  The duration of "on time&

MicroPython #2: Triggering I/O's

Image
MicroPython Triggering Input / Output Ports   At the end of this, you will be able to trigger High and Low voltages to your I/O ports and see it on inbuilt LED in Pin2 of ESP 8266 and also by attaching external LED's. The whole process will be done by MicroPython programming. So, Let's begin with !  Note : You must have your MicroPython firmware pre-flashed onto your board before begining with this. If not, follow up MicroPython #1: Introduction and Gearing Up   before getting back here. >>  Initial IDE Setup  >> Connect the board to your computer via USB cable (Check if it has data transfer too) Here, I am using ESP 8266 NodeMCU - V.3 board to run MicroPython. >> Open your Thonny IDE and do initial setup as follows: >> Go to Tools >> Options in the top window.  The above dialog box appears and in Interpreter window, select MicroPython (Generic) language for intrepreting. Select your respect

MicroPython #1: Introduction and Gearing Up

Image
MicroPython An Inroduction and Firmware Flashing to the Tool MicroPython is re-implemented form of  Python 3  programming language that is optimised to run on microcontrollers and in constrained environments. It is much similar to generic Python programming language. Simply said, MicroPython is Python for Microcontrollers. It only includes a small subset of the Python standard library. It also includes modules to access low-level hardware this means that there are libraries to easily access and interact with the General Purpose Input/Output (GPIO's) of Microcontrollers.  Usually on Microcontrollers, we run Embedded C, C++ or other forms of this language. Here with MicroPython, we can integrate Python environments with MC's and program them. Using Python with MC's extends the power of these small embedded chips and takes it to next level opening vast powerful platform for Embedded Technology Industries, Developers, Hobbyists and also Students. Get