CrAzY STOPWATCH using Arduino
Hello world,
In this project we are going to make a simple "crazy stopwatch" Using Arduino UNO and a LCD display.
Full working video link - here
>>Overview :
 |
| Crazy stopwatch |
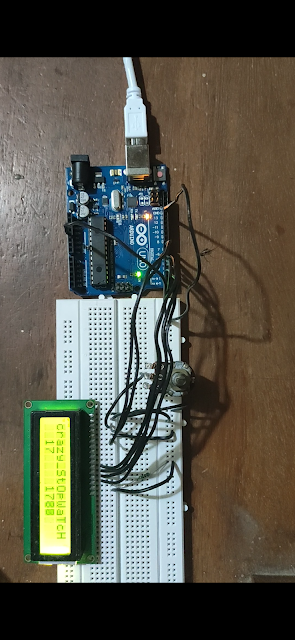
The fully done project looks something like this.
Basically, the Arduino serves as motherboard to which we can upload programs and make it run as we like. Here, we are giving a code with time stamp as input to microcontroller and it will change every millisecond to display or count seconds which is being displayed in a LCD display connected to it.
>>Basics of LCD and circuit diagram :
1) Liquid Crystal Display(LCD) :
Here, we are going to use a basic 16x2 LCD display. Let's see more about it.
The 16×2 LCD display is a very basic module commonly used in projects and circuits. The 16×2 translates o a display 16 characters per line in 2 such lines. In this LCD each character is displayed in a 5×7 pixel matrix.
The pinouts look like this.
Now, let us see how to build the circuit.
16x2 LCD pinouts.
The following show the circuit diagram.
 |
| Circuit diagram: crazy stopwatch |
The LCD display must be connected to the respective ports on Arduino as shown. A potentiometer is used just to regulate the brightness of the LCD since, sometimes it's not visible due to glaring.
>>Code (Arduino IDE) :
#include <LiquidCrystal.h>
LiquidCrystal lcd(12, 11, 5, 4, 3, 2);
void setup()
{
lcd.begin(16, 2);
lcd.print("StOpWaTcH");
}
void loop()
{
lcd.setCursor(2, 1);
lcd.print(millis() / 1000);
lcd.setCursor(8,1);
lcd.print(millis()/10);
}
Here is a GitHub link for these;
https://github.com/NavadeepGaneshU/CL3VERTRONICS
Report:
Note: connect the LCD pins to the same ports as shown in the code. (12, 11,5,4,3,2)
As soon as you upload the code to Arduino and run it, the stopwatch will start to count in seconds and milliseconds.
Full working video link - https://youtu.be/DOske96fj24
Gallery:

Thanks for scrolling. Do share your project after you do it.Any queries, just post it on comment box below.
Happy time. CHEERS !!!!!!


Comments
Post a Comment